

In this article we’re taking a look at how you can tune your music to the “more harmonious” and “more healing” tuning 432 Hz in Ableton Live. We’ll go through how you can tune built-in instruments inside of Ableton Live, how you can tune external plugins, what to consider when recording your voice and instruments live in 432 Hz, and what to do if you’re still on an older version of Ableton Live without the built-in tuning feature.
What does tuning actually mean?
If you think about an orchestra, all instruments inside the orchestra need to be tuned to one specific pitch. That means when one instrument plays an A, the A of the other instruments should be on the same pitch. If that’s not the case, all instruments are playing “out of tune,” as every A of each instrument is slightly different – which would sound terrible. So there needs to be one pitch that everyone tunes their instruments to.
Since 1955, A=440 Hz has been the standard tuning that most musicians, producers, and creators around the world use. That’s therefore also the tuning we find as the default in most software, sample libraries, and instruments. Whenever we want to work in alternative tunings like 432 Hz, we need to know how to tune everything down from that default.
There are three workflows I recommend for tuning music to a different tuning:
- Tune as you go – set your tuning at the start of a project and keep everything in 432 Hz throughout the production. With that, you have full control over the frequencies and you avoid any distortions that occur if you’d tune afterwards.
- Tune at the end – produce your whole track normally in 440 Hz, export the mix, and then tune the mixdown audio file down to 432 Hz as a final step. That’s the fastest way, but less precise.
- Produce in 440 Hz and tune every instrument individually at the end – make your song the normal way in 440 Hz, then go back and tune each instrument and plugin individually instead of the whole mixdown. With this workflow, you get the best of both worlds. It’s more precise than tuning at the end, while still letting you produce in the familiar 440 Hz environment without technical disturbances.
Now let’s take a look at each method below.
Method 1: Ableton’s built-in tuning feature (Live 12+)
If you’re on Ableton Live 12 and you use Ableton’s own instruments, this is by far the easiest path:
- Open the browser and find the Tunings section.
- Choose a tuning system – for a simple 432 Hz shift, use 12 TET.
- Double-click it to open the tuning window.
- You’ll see a Hertz field. Change it from 440 to 432.
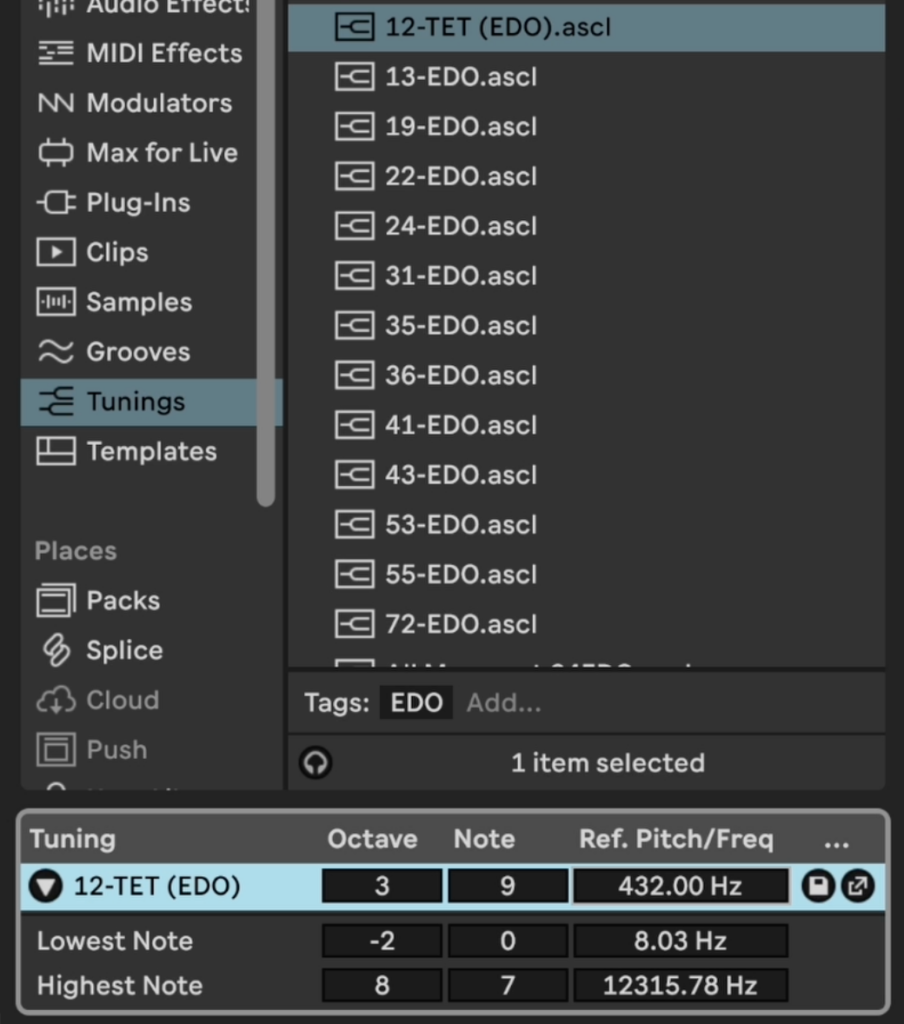
Now Ableton changes the tuning of each built-in instrument automatically with just one click.
Important limitation: this only affects Ableton’s own built-in instruments, like the Operator or Sampler. External plugins (Serum, Analog Lab, and other third-party synths) and audio clips won’t automatically follow this setting – you’ll need to tune those separately (see Method 2).
Method 2: Tuning external plugins/instruments individually
Most external plugins come with a knob or a parameter to control the tuning, but that’s not always in the same place.
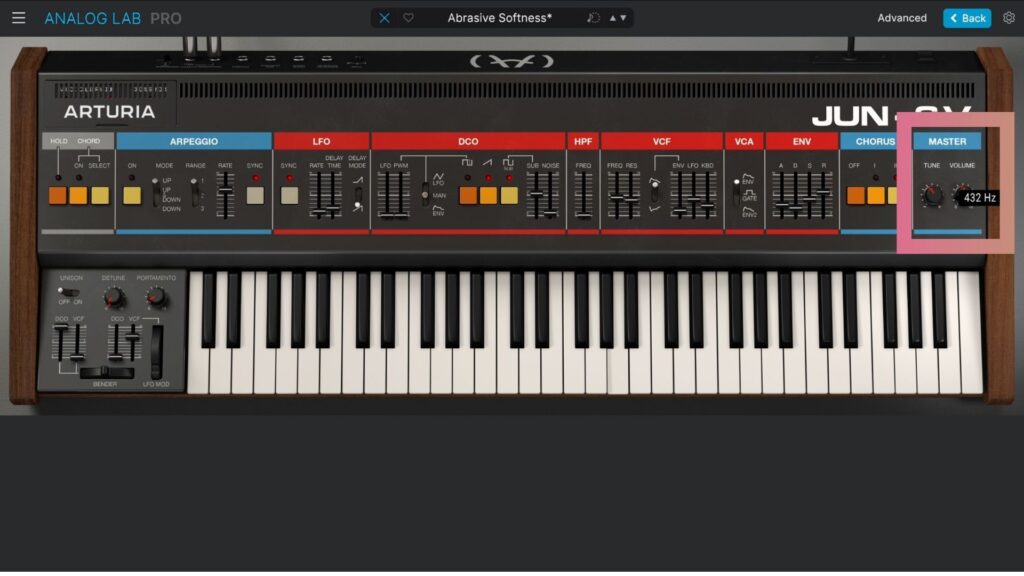
- Look for a tune or master tune control directly on the plugin’s interface – often a slider or knob.
- If you don’t see one immediately, check the plugin’s settings menu or the manual – some plugins bury this deeper in their settings.
- Set the tuning based on cents rather than Hz – most plugin tune controls work in cents, not Hz directly. The difference between 440 Hz and 432 Hz is approximately -31.77 cents. Since most software only accepts whole numbers, round that to -32 cents.
You’ll need to repeat this for every external instrument in your project. If a plugin has no tuning option at all, see Method 4 below (resampling).
Quick way to check you got it right: add an Operator (or any simple sine wave generator) on its own track, set it to a fixed frequency, and enter 440 Hz. Play it alongside your other tuned instruments. If everything is correctly tuned to 432 Hz, the sine wave at 440 Hz will sound slightly “off” or create a subtle beating/wobble against the rest of the track. Change the Operator to 432 Hz and it should blend in cleanly. This is a fast way to double-check your ears aren’t missing something.
Method 3: Recording live instruments
If you’re recording a live instrument – handpan, singing bowl, voice, anything acoustic – it’s the instrument’s own physical tuning that matters, not a software setting.
- If the instrument is already tuned to 432 Hz (some handpans, singing bowls, and other healing instruments are made this way), you can just record it – it’s already correct, there’s nothing else to do.
- If the instrument is tuned to 440 Hz (most standard instruments), you need to pitch the recording down after the fact:
- Select the recorded clip.
- Use the clip’s transpose/pitch control – note that this usually only allows whole semitone steps, which is too large a change.
- For the fine adjustment, use the cents field (same -32 cents value as in Method 2).
- If the pitched-down result sounds slightly wobbly or unnatural, change the clip’s warp mode to Complex Pro – this uses a different algorithm for pitch shifting and usually sounds much smoother, especially on percussive or textured instruments like the handpan.
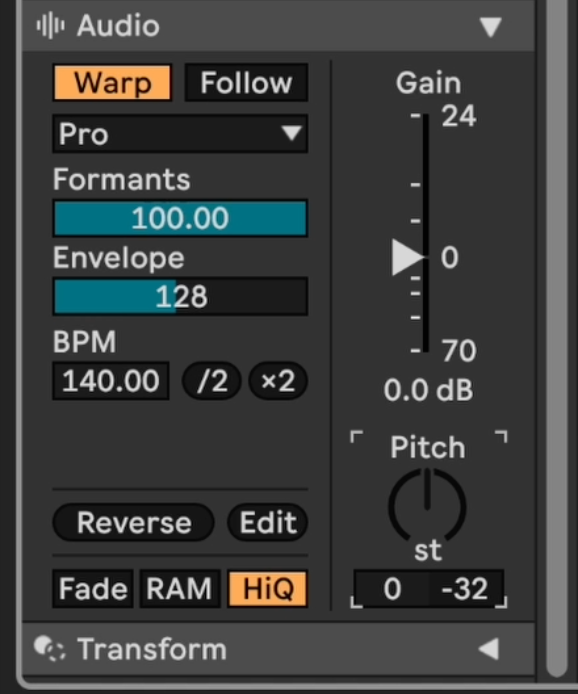
Note: the exact cent adjustment can vary slightly depending on the specific instrument – if something still sounds a little off, trust your ear and nudge it up or down a cent or two.
Method 4: Tuning a whole project after the fact
If you have a large, finished project – many tracks, many plugins, some without tuning options – retuning each element individually can be impractical. In that case, it’s easier to tune the whole mix at once instead:
- Finish the production normally in 440 Hz.
- Export the full mix (File → Export Audio/Video → PCM, WAV, 24 Bit, 44100 Hz for standard quality).
- Start a new, empty Ableton project and drag in the exported file. This file is currently in 440 Hz.
- Select the clip and apply the same -32 cents tuning adjustment as in Method 3.
- If it sounds wobbly, switch the clip’s warp mode to Complex Pro, same as with live recordings.
Two things to keep in mind with this approach:
- Don’t do this with vocals that are already recorded. Tuning a finished vocal recording down afterward changes the character of the voice noticeably. If the track has vocals, tune the instrumental to 432 Hz before recording vocals on top – never after.
- Tuning down after the fact makes the file slightly longer. If the project needs an exact length (for example, matching a specific video), keep that in mind, or use the warp-mode approach instead of turning warp off entirely.
Older Ableton versions (Live 11 and earlier)
If you’re on Ableton Live 11 or older, you won’t have the built-in Tunings browser feature – but there’s a free workaround using a Max for Live device.
- Go to the Ableton website and download the Micro Tuner Max for Live device (make sure you’re logged into your Ableton account first – it’s a free download).
- Open Ableton, go to the Packs/Max for Live browser, and search for Micro Tuner.
- Drag it in front of the instrument you want to tune (it needs to sit before a MIDI instrument in the chain).
- Click Generator A to start from scratch – no preset file needed.
- Find the base frequency setting and change it from 440 Hz. For 432 Hz, the correct value is 256.85 – not 432 directly, since Micro Tuner works from a different base reference point.
- Play a note to confirm – you should hear the pitch drop slightly compared to standard tuning.

This device works even if you’re on Live 12 and prefer it – it just uses a different method than the built-in tuning feature.
Note: this method, and the built-in Ableton tuning feature, changes the concert pitch – shifting everything down uniformly – not the temperament of the scale itself. That distinction matters for advanced tuning theory, but for the purposes of this guide, the simple pitch shift covered here is all we need.
Adding a 432 Hz reference tone (optional)
Some producers like to layer a pure 432 Hz tone underneath the final mix, especially for meditation tracks – similar to how you might add a binaural beat or isochronic tone.
- Add an Operator (or similar simple oscillator).
- Set it to a fixed frequency.
- Enter 432 Hz – or another target frequency, like a Solfeggio frequency.
- Keep the volume low – we’re not meant to clearly hear this tone, just have it present under the mix. If it’s clearly audible, it’s too loud.
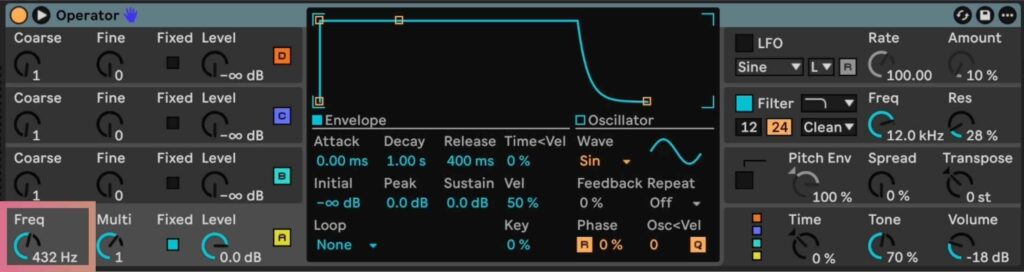
This step is optional and separate from the tuning process itself – it’s an added layer, not a requirement for a track to “be in” 432 Hz.
Quick troubleshooting
- Something sounds “off” when instruments play together: one of them likely wasn’t tuned correctly, or is still at 440 Hz. Use the Operator sine-wave check from Method 2 to isolate which element is mismatched.
- A retuned recording sounds wobbly or unnatural: switch the clip’s warp mode to Complex Pro.
- You recorded vocals and now want to change the tuning: don’t tune the vocal take itself – if the tuning needs to change at this point, re-record the vocal over a correctly-tuned instrumental instead.
- A plugin has no tuning option at all: resample it – record its output as audio – and pitch that recording down using the cents method from Method 3.
Want to see this whole process recorded live, screen by screen? I’ve made a video walking through each of these steps inside Ableton.